Tuesday, October 30, 2012

Tasty Tuesday: Spooky Witch Fingers

Welcome to Tasty Tuesday, Halloween edition! These fun, creepy, little cookies submitted by Alisha are a perfect treat for your Halloweenies!


The Ingredients:

  • 1 cup butter, softened
  • 1 cup powdered sugar for cookies that aren't as sweet. (For sweeter cookies, add additional 1/2 cup of powdered sugar & 5 tbsp of white granulated sugar)
  • 1 egg
  • 1 tsp almond extract
  • 1 tsp vanilla extract
  • 2 2/3 all-purpose flour
  • 1 tsp baking powder 
  • 1 tsp salt
  • 3/4 cup whole almonds
  • 1 (.75 oz) tube red decorating gel
  • green food coloring (optional)
  • chocolate chips (optional)

The Directions:


Combine the butter, sugar, egg, almond extract & vanilla extract in a mixing bowl. Beat with electric mixer. While continually beating, gradually add flour, baking powder & salt. If desired, add green food coloring to make creepy green witch's fingers.

Refrigerate dough for 20-30 mins.

Preheat oven to 325 degrees. Grease baking sheets.

Remove dough from fridge in small amounts. Scoop 1 heaping tsp at a time onto a piece of waxed paper. Either use the waxed paper or your hands to roll the dough into a thin finger-shaped cookie. Be sure not to make the "finger" too fat, because it will double in size when it's baked.

Ok, this is where you can get creative...

Press one almond into one end of the finger to look like a long fingernail. Squeeze cookie near the tip & near the center to look like knuckles. Use a sharp knife to make shallow cuts in the knuckles to make them look wrinkly. If desired, hollow out or indent the "base" of the finger slightly. You can also add a chocolate chip to look like a wart.

Once you get your fingers all decked out, arrange them on the baking sheets. Bake in preheated oven for 20-25 mins.

 Remove the almond from the end of each cookie & squeeze a small amount of red decorating gel into the cavity. Replace the almond to make the gel squish out around the tip of the cookie. You can also add some red gel into the indented base of the finger.

(Click here for source)

Thursday, October 25, 2012

A visit to Hardy Berry Farm!

This morning was our October MOTT at Hardy Berry Farm... so fun! I really enjoyed visiting with moms I already know & meeting a few new ones.

The jump pillow was a favorite!


And we took a hayride down through the woods to visit the pumpkin patch:

Love this picture of all the littles learning about pumpkins! :)


Then we visited the animals...


And I'll leave you with a pic of two of the little Martin minions... look at those angelic little faces! :)

Wednesday, October 24, 2012

Halloween cuteness!

Halloween is a week from today... so to kick off the countdown, here are a few little snazzy ideas for you & the kiddos!

How about a rousing game of Halloween bingo? Or ridiculously cute treat bags?  Check out these FREE printables:


And here's a little mix-&-match pumpkin game that would be perfect for preschoolers... & felt is crazy-cheap, which is perfect for the budget:


And have you decorated your pumpkins yet? It's on our agenda for this weekend... love these ideas! 
From left to right:
  1. Chevron pumpkin -- done with painter's tape & whatever paint you have on-hand (spray paint, acrylic, etc will work)
  2. Cookie cutter pumpkin -- use a sturdy metal cookie cutter & a mallet to cut shapes (tutorial here)
  3. Button pumpkin -- done with buttons & straight pins... how easy is that?

And I'll leave you on this note... don't know about your house, but this printable is more than a little appropriate for ours :)

Tuesday, October 23, 2012

Tasty Tuesday: Pumpkin Chocolate Chip Muffins


These muffins just taste like fall... what's not to love about pumpkin & chocolate?!? Thanks so much to Emily for sharing this recipe!


The Ingredients:


  • 1 1/2 cups all-purpose flour
  • 1 tsp baking soda
  • 1 tsp ground cinnamon
  • 1/4 tsp ground ginger
  • 1/4 tsp allspice or ground cloves
  • 1/4 tsp freshly ground nutmeg
  • 1/2 tsp salt
  • 1/2 cup unsalted butter, room temperature
  • 1 cup white sugar
  • 2 large eggs
  • 1 tsp vanilla extract
  • 1 cup solid packed, canned pumpkin puree
  • 1 cup semisweet chocolate chips

The Directions:


Preheat oven to 350 degrees. Place rack in middle of oven. Line 12 muffin cups with paper liners or spray each cup with non-stick cooking spray.

In a large bowl, sift together flour, baking soda, spices & salt.

With a mixer, cream butter & sugar until light & fluffy. Add eggs one at a time, beating well after each addition. Beat in vanilla extract. Scrape down the sides of the bowl. With the mixer on low speed, alternately add the flour mixture & pumpkin puree, beginning & ending with flour mixture. Fold in chocolate chips.

Fill muffin cups evenly with the batter using a large spoon or ice cream scoop. Place in oven & bake for about 18-20 mins, or until firm to the touch & a toothpick inserted in the center of a muffin comes out clean. Place on a wire rack to cool.

Note: the batter can be also be baked in a 9-inch loaf pan instead of muffin cups. Butter or spray the loaf pan with cooking spray. Bake the loaf at 350 degrees for about 50-60 mins, or until a toothpick inserted in center comes out clean.

(Click here for source)

Tuesday, October 16, 2012

Tasty Tuesday: Chocolate & Peanut Butter Acorns

Super-cute recipe from Aubrey this week... these yummy fall treats are easy enough for your little ones to help you!


The Ingredients:


  • Mini chocolate chips
  • Hershey's Kisses
  • Bite-size Nutter Butter cookies

The Directions:


Melt a 1/2-bag of mini chocolate chips in the microwave at 5-second intervals, stirring well each time.

Dip the flat end of a Hershey's Kiss into the melted chocolate & top with a Nutter Butter.

Dip the flat end of a mini chocolate chip into the melted chocolate & place on top of the Nutter Butter to make your acorn's stem.

Repeat until you use all your ingredients to make the cutest fall snack ever!

(Click here for original source)

Monday, October 15, 2012

yard sale success!!

our Anderson MOPS piggy bank!
This past Saturday was the long-awaited yard sale.
We made money! WOOHOO!
It's over! WOOHOO!

On Friday night, Steering Team gathered at New Covenant & unloaded tons of stuff. I'm talking TONS of stuff. And we were worried that we wouldn't have anything to sell. Ha. It took about 3.5 to 4 hours to get everything unloaded, unpacked & sorted. By midnight, we were delirious & a little bit crazy... but the entire lobby of New Covenant was lined with (relatively) neatly sorted piles of merchandise.

On Saturday morning, we dragged our weary selves out of bed &, armed with large Dunkin' coffees, had things set up & ready for business by 7:30am. There was a steady stream of shoppers during the entire morning.... our signs & website postings seem to have done the job quite well!

Although the final numbers aren't yet in, the preliminary total is approximately $700... most definitely worth cleaning out our garages & attics!  And we had the opportunity to meet quite a few new Anderson mamas. I'm keeping my fingers crossed that they'll come to MOPS next month :)

Thanks so much for all you ladies who worked the sale, made baked goods, set up Friday night, collected items from friends & family, came to shop, or posted the sale info on your Facebook. Thank you, thank you, thank you!

Saturday, October 13, 2012

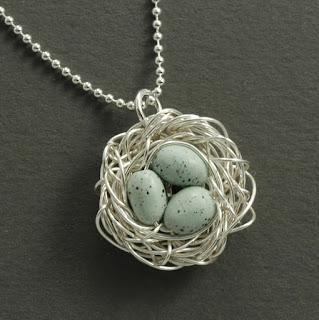
getting crafty: bird nest necklaces

Our craft during this month's meeting was a huge hit... who doesn't love a cute little bird nest necklace? These would be great gifts for friends, family or even your child's teacher. And how sweet would these be for mother & grandmother gifts? Can't wait to hear if anyone decides to make one at home!

What you need: 

  • 2 yards of 24-gauge jewelry wire (you can change the gauge to give your necklace a lighter or heavier look)
  • pretty glass beads in whatever color you want (glass works better than plastic because they don't get scratched as easily)
  • necklace chain

Instructions: 

  1. (Optional) Twirl wire around a pencil or pen to make a corkscrew. This will give the wire more texture. (See pictures below for textured vs. smooth.)
  2. Straighten wire & thread desired number of beads onto one end, arranging them as you please. 
  3. Wrap wire around your "eggs" until you have formed your "nest"... you will have some leftover wire at this point. It may be helpful to hold the beads between your index finger & thumb as you wrap the wire around. 
  4. Now it's time to secure your nest. Thread the end of the wire up through the nest from back to front. Wrap it around the edge of the nest in the spaces between the beads. You may want to wrap it neatly for a structured nest, or you may want a more unstructured "freeform" nest. (See pictures below for examples.)
  5. On the back of your nest, use remaining wire to form a small loop to thread your necklace through (remember that your necklace clasp has to fit through it so don't make your loop too small). Secure loop by wrapping wire around its base and/or twisting the wire through an existing coil on the nest. If your loop gets squished while you're securing it, use a pen to help round it back out. 
  6. Cut off excess wire & tuck loose end into nest. 
  7. Put your lovely little pendant on your necklace & enjoy!
And because I can't resist sharing pretty pictures, here are a few of my favs:

Example of a neatly structured nest (click here for source):

Example of a "freeform" nest with more texture (click here for source):


Example of a nest with a single "egg" (click here for source):

Example of various colored "eggs" (click here for source... this is the original tutorial that inspired this crafty cuteness!):

Friday, October 12, 2012

October meeting recap!

Our October meeting was yesterday, & we had another great turn-out! I'm so excited to see new moms joining us! Welcome, y'all!

Our devotional was incredibly moving & powerful... Jackie shared her story of her childhood & how she eventually came to Christ. I hope to publish a more in-depth recap of her wonderful devotional soon.

And our craft? Was SO STINKIN' CUTE! Tutorial coming soon, I promise!

Our topic for this meeting was "Diving into Love Languages with Kids." As moms of preschoolers, this is such an important thing to consider since these years are the most formative of a child's life & have a huge impact on the adult that they'll become. I don't know about you, but I find the importance of my actions & words both exciting & terrifying... I want so much to be the kind of mama who will help make my little girl become an incredible woman one day!

Patti Rountree from New Covenant Church was our speaker. Her very informative talk was divided into six main points:

  1. Speak respectfully to your children & expect (demand) the same from them. Ms Rountree said that she uses an elderly & much-loved neighbor as an example for her children... when they speak harshly to each other, she asks "Would you speak to Mrs. Wilson that way?" This gives them a point of reference of how they should to speak to everyone in their lives. 
  2. Be a good listener. Your children will mimic the way you listen. So many times, we want to insert a solution before our child even tells us the problem. Sometimes, it's more important to just listen to what they have to say. 
  3. Keep confidences. It's tempting to tell about something hilarious they said or did, but we have to be careful not to embarrass them, especially as our children become older & more self-conscious.
  4. Be their biggest fan! If they want to play soccer, let them... & cheer even if they stink. They don't have to be the smartest kid in class for you to be proud of them. Even when they're struggling, they should never have to question your love & support. 
  5. Don't squelch their personalities. Teach & discipline them, but remember that each child is an individual & has their own quirks. Ms Rountree gave the example of her own three children... if she gave a list to her oldest, he would immediately begin & neatly check off each item as he completed it. If she gave the same list to her middle child, she would start the list with the best of intentions, but then get distracted... & eventually, she would lose the list. If she gave the list to her youngest child, he would want to discuss it, but not actually do it. 
  6. Remind your children that they are made in the image of God. They are beautiful & smart & important no matter what.

Recommended Reading:

Tuesday, October 9, 2012

Tasty Tuesday: Olive Garden Zuppa Toscana

Olive Garden? Love. The tastiness of Olive Garden at home? Super-love. Here's a copycat recipe from the kitchen of Abbey... can't wait to try this one!


The Ingredients:

1 lb Italian sausage (mild or spicy, it's up to you)
2 large russet baking potates, sliced in half & then in 1/4-inch slices
1 large onion, chopped
1/4 cup bacon bits (optional)
2 garlic cloves, minced
2 cups kale or swiss chard, chopped
2 8-oz cans chicken broth
1 quart water
1 cup heavy whipping cream
Salt & pepper

The Directions:

Chop or slice uncooked sausage into small pieces. Brown sausage in your soup pot, then remove. (Abbey threw her onions in the pot as well to saute them... you can do that or add them raw in the next step.)

Pour chicken broth & water into pot & stir. Then add onions (sauteed or raw), potatoes & garlic. Cook on medium heat until potatoes are done.

Add sausage & bacon. Salt & pepper to taste. Simmer another 10 mins, then turn heat to "low."

Add kale (or chard) & whipping cream. Heat through & serve.

(Click here for original source)

Tuesday, October 2, 2012

Tasty Tuesday: Fresh Apple Cake

This delicious recipe was submitted (& made multiple times) by Jennifer H. It was featured in "Southern Living" & is a perfect dessert for fall (or winter, or spring, or summer)!  Jennifer made it with browned butter frosting, but it would also be good with cream cheese or even chocolate frosting.


The ingredients:

  • 1 1/2 cup melted butter
  • 2 cups sugar
  • 2 large eggs
  • 1 tsp vanilla extract
  • 2 cups all-purpose flour
  • 2 tsp ground cinnamon
  • 1 tsp baking soda
  • 1 tsp salt
  • 4-5 large Granny Smith apples, peeled & cut into thin slices
  • 1 1/2 cups chopped pecans (optional)

Browned Butter Frosting:

  • 1 cup butter
  • 1 (16-oz) pkg powdered sugar
  • 1/4 cup milk
  • 1 tsp vanilla extract

The Directions:

Preheat oven to 350 degrees. If you decide to use pecans, bake them in a single layer 5-7 minutes or until lightly toasted. Be sure to stir them halfway through.

Stir together butter, sugar, eggs & vanilla extract in a large bowl until blended.

In a separate bowl, combine flour, baking soda & salt (or use self-rising flour) & cinnamon. Then add to butter mixture & stir.

Stir in apples & 1 cup pecans (if desired). Batter will be very thick. Spread batter into a lightly greased 13x9 pan.

Bake at 350 degrees for 45 minutes or until a toothpick inserted in the center comes out clean. Cool completely & frost. Sprinkle remaining pecans on top (if desired).

To make frosting:
Cook butter in a small saucepan over medium heat, stirring constantly for 6-8 mins or until butter begins to turn golden brown. (Don't forget to stir!... butter will burn!) 

Remove from heat immediately & pour into small bowl. Cover & chill for 1 hour or until butter is cool & begins to solidify. 

Beat butter at medium speed with mixer until fluffy. Lower mixer speed to "low" & gradually add powdered sugar alternately with milk, beginning & ending with powdered sugar. Beat mixture at low speed until well-blended. 

Stir in vanilla extract.

(Click here for original source)